In Fibonacci Part 2 of the guide I want to cover the retracement and expansion tools in depth as they are really one of the best tools available for traders out there. I will show you a way to combine them both along with some other methods in order to create a strategy and trade it. Before we begin make sure to go over the first part of this article and read the basics of Fibonacci by clicking here.
The two most common and frequently used Fibonacci Tools are Retracement and Expansion. Let’s see what each of them means and how to use them.
Fibonacci Retracement
As the name suggests this tool is used to find the best retracement levels according to the fibonacci sequence. The most important numbers to follow are 38,2%, 50%, 61.8%. A less common and many times underappreciated level is 23.6% which would many times play a great support/resistance role in powerful moves where the trend is so strong that this is the only correction we get.
How to Plot The Fibonacci Retracement on The Chart
It is fairly easy to place to retracement tool on the chart. First thing is first, you should identify the last move and its direction. Once you have found the “leg” or wave you can place the retracement lines.
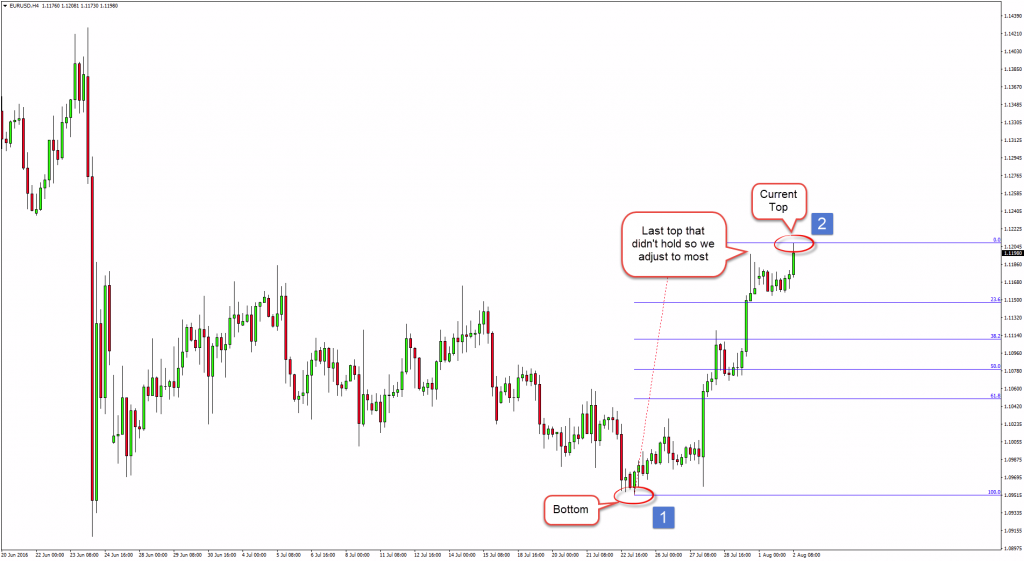
Bullish trend – in a bullish trend (up trend) you would always place the starting point at the bottom of the move (1) and the ending point at the top (2). Here is an example:

The default levels predefined in MT4’s fibonacci retracement tool are 23.6%, 38,2%, 50% and 61,8%. At this point once the correction starts of course, we can expect the price to find support near the levels mentioned above.
Bearish Trend – when the trend is bearish you would place the starting point of the fibo tool at the top, towards the bottom.
Let’s have a look at a past example and see how it worked out.
Price was pushing up and then managed to break the last low, creating a lower low along with lower high. This is the first sign that the price is changing its direction even if that would be for the shorter term only. Once we get a lower low (ignore the first one as there wasn’t a big correction there and it’s not good for our example) and price start correcting we can place the retracements tool starting from the top toward the bottom.
Notice how the price had difficulties going through these zones (red rectangulars in the image) creating a good support/resistance zone. This is indeed why many traders would use these levels as entry/exit points. Ok so far nothing really new as opposed to the first part of the article.
Before I show you the creame de le creame and how to put it all together let’s quickly go over the fibonacci expansions.
Fibonacci Expansion
This tool is generally used to predict where the future price movements. With the retracement we are looking for the price to stop at some point (level) and continue in the original direction. On the other hand the fibonacci expansion has the goal to show us where would the price go in the direction of the trend.
How to Plot The Fibonacci Expansion on The Chart
Bullish Trend – There are 3 reference points that you need before you place the expansion tool. In a bullish trend wait for the initial move, then the correction. Once the price breaks above point B you can place the fibonacii expansion on your chart. Ideally we want to see the correction going below 23.6% retracement at least. Otherwise you would end up re-adjusting the tool almost every candle.
I have taken 3 screenshots of the same chart, plotting the fibonacci retracement at the short term tops. Notice how the retracements didn’t reach 23,8% until the 3rd image.
Image 1
Image 2
Image 3
That would be step one of determining the first two reference points of the fibonaci expansion tool. Of course we want the price to be making higher highs and higher lows in order to qualify as an up trend. Once that happens (retrace to at least 23.6%) we should wait for the price to break the last high, confirming for us that the correction is over and this is indeed the low that we are looking for.
Correction to 23.6% then last high at point B is broken up, thus point C has now been created an we can plot the fibo expansion.
Here is how the fibonacci expansion would look like in this situation:
We now see two projected levels 100% and 61.8%. We can now expect the price to reach at least the first level. There is another projection level which is not visible (slightly above) at 161.8%. These are the 3 most commonly used levels and by default you will find them in your MT4 fibonacci expansion tool.
Now that we have reviewed the retracement and the expansion let me show you how I used it in combination with some other tools to extract tons of pips from the market. If it seems complicated don’t get excited just yet, it is not. It just takes a bit of practice and it is really a few steps to follow. The tools are going to do most of the job for you anyway.
Trading with Fibonacci Retracement and Expansion
Ok, the idea is really simple. We want to find the beginning of a new trend and then join at the corrections. To do so we use fibonacci retracement and fibonacci expansion tools. We would identify the end of the correction with the help of the expansion tool. Basically we want to see two waves down or two waves up (fibonacci expansion 61.8%, 100% or 161.8%) during the corrective phase. Once the price reaches these levels we want to jump in as we expect the price to continue higher.
Many people get confused here as we usually use the Fibonacci expansion to project price movements in the direction of the trend. However when you look at it from a different point of view, the correction is also a micro trend within the big trend. Let me show you the example.
First of all find a trend.
For a bearish trend – preferably a top – up move followed by break below the last low, creating lower highs and lower lows. The idea here is to find the beginning of a new trend.
Vice versa for the bullish trend – find a bottom where price is breaking above last high and starts to create higher lows along with higher highs.
Looking at the bigger picture, there was an up move here, and then price went for some kind of correction. Now see where I have marked the higher highs created on the chart confirmed by MACD which also creates higher high. There is also a strong supportive zone at the bottom.

Once you spot that, move to step two which is placing the fibonacii retracement tool. We are now looking for the price to reach at least 23,8% before we can start looking for the 3 reference points of the fibonacci expansion tool.

Dropping down to the M15 chart reveals how we would now plot our fibonacci expansion tool in order to determine the potential end of the correction.
We have the 3 reference points once the low of point 2 is broken. We can now plot the fibo expansion.
Now you want to focus on 100% and 161.8%. 100% is a duplication – you might also see it under the name ABCD. Wave down, correction, another wave down almost equal to the first one (opposite for up trend).
We have placed the fibo expansion and we can now start looking for entries. To do so you will use a few methods.
Always check for divergence. Divergence will confirm that the correction is near its end.
See if there are any trend lines you can use that coincide with the levels:
A trend line with and without the spikes.

Re-apply the fibonacci retracement tool and see for retracement and expansion levels that coincide. These are called magnetic levels/zones and attract/push the price very accurately most of the times.
Red lines are expansion levels, blue ones are retracement levels. Marked in black rectangles you see where the two come really close to each other creating a magnet level.
Entry/Targets/Stop
The Entry
Best way to enter a trade would be with the completing of the divergence – macd histogram ticking up + bullish candle pattern near a good level. Let’s review our example.
- Technically that was a divergence. However it only happened at 61.8% and we said we want to focus on 100% and 161%. So even though it was at a magnetic level we would leave it and wait for better price to enter long.
- Price bounced of the second magnetic level which was also 100% BUT it didn’t create a bullish candle pattern for us.
- Another divergence was re-created. We got a nice bullish harami. Price is near the magnetic level consisting of fibo retracement 61.8% and fibo expansion 100%. It looks fine at this point for an entry.
If you are not sure try to find another confirmation supporting your view. Here I have plotted two bullish trend lines. One is coming from the very bottom (ignoring the spikes) and the next one is more recent covering last two spikes.
You can see that price false broke one of them and bounced by the pip of the other one. This would be also a great zone to place our stop loss.
The Stop Loss
Not much to say here. Just find good support/resistance zone and protect your trade below/above it. That could be magnetic level, horizontal S/R, trend line etc…
The Targets
Aiming to enter a trade only at least at 100% expansion is not a coincidence. A deeper correction, allows us to have more pips until the top/bottom.
In this case aiming the swing high would bring us a risk:reward of more than 1:5. In other words for every $1 your risk, you could win $5.
Looking forward to hear your comments! If you like it – share it!
Yours,
Vladimir


